


Pumping takes time. Then comes the part that no one puts on the schedule: taking apart the pump, rinsing every little piece, washing everything, waiting for it to dry, and getting it ready for the next session.
If you're pumping several times a day, that routine can quickly become one of the most repetitive parts of your day.
The solution isn't to skip cleaning. It's to build a faster, more repeatable cleaning system.
What Is the Fastest Way to Clean Breast Pump Parts?
The most efficient routine is usually:
Pump → Separate → Rinse → Wash → Dry → Store
Instead of treating every pumping session as a new cleaning project, keep the same setup and sequence every time.
CDC recommends cleaning pump parts that come into contact with breast milk after every use. Parts should be separated, rinsed, cleaned, and allowed to air-dry thoroughly before storage.
1. Create a Dedicated Pump-Part Cleaning Area
You don't need an entire counter dedicated to pumping.
A simple setup can include:
- A clean wash basin
- Dish soap
- A pump-part brush if recommended by the pump manufacturer
- A drying area
- A clean storage area
- Your preferred cleaning appliance
Keeping everything together means fewer trips between the sink, drying rack, and storage cabinet.
CDC recommends using a wash basin dedicated to cleaning pump parts and infant feeding items if you hand wash them.
A simple setup:
Dirty Parts → Wash → Dry → Clean Storage
The fewer steps you have to think about, the easier the routine is to repeat.

2. Separate Pump Parts Immediately
After pumping, don't leave the entire pump kit assembled on the counter.
Separate the components that came into contact with breast milk, including:
- Flanges
- Valves
- Membranes
- Connectors
- Milk collection bottles
This makes it easier to rinse away milk residue before it dries.
CDC recommends taking apart the pump kit and cleaning milk-contact parts as soon as possible after pumping.
One small habit that helps:
Separate first. Clean second.
It prevents the next cleaning cycle from starting with a pile of dried-on residue.
3. Rinse Before Milk Residue Dries
Fresh milk residue is generally easier to remove than dried milk.
After separating the parts, rinse milk-contact components under running water. Then move directly into your chosen cleaning method.
This doesn't replace washing. It simply makes the next step easier.
If you're pumping repeatedly throughout the day, that small transition can help keep each cleaning cycle more manageable.
4. Choose the Right Cleaning Method
There isn't one cleaning method that works for every pumping routine.
Hand Washing
Hand washing gives you direct control and works well for occasional pumping or when you don't have access to an appliance.
Use a clean basin, dish soap, warm water, and the cleaning method recommended by your pump manufacturer. Rinse thoroughly and allow the parts to air-dry.
Best for: occasional pumping or simple setups.
Dishwasher
If the pump manufacturer says the parts are dishwasher-safe, a dishwasher can reduce manual washing.
Place small parts in a closed-top basket or mesh bag so they don't fall through the rack. Use the dishwasher settings recommended for the parts.
Best for: parents who already run the dishwasher regularly.
Bottle Washer
For parents who pump frequently, a dedicated bottle washer can make more sense because it is designed around baby feeding gear and can combine multiple steps.
Best for: frequent pumping, bottle feeding, or families cleaning several types of feeding accessories every day.
5. Keep Extra Pump Parts on Hand
One of the easiest ways to make pumping less stressful is to avoid making every pump session depend on the previous load being clean and dry.
If you pump frequently, having multiple pump kits means you can use a clean set while another set is being washed.
This can be particularly useful at work or when you don't have convenient access to a sink. CDC specifically suggests bringing multiple pump kits to work so a clean kit is available for each pumping session and used parts can be washed later.
Think of it as creating a small buffer:
Clean Set → Pump → Used Set → Wash → Ready
Instead of:
Pump → Wash Immediately → Wait → Pump Again
6. Don't Forget the Drying Step
Washing is only part of the routine.
After cleaning or sanitizing, pump parts should be allowed to air-dry completely in a clean, protected area. CDC recommends avoiding drying pump parts with a dish towel because the towel can transfer germs back onto the clean parts.
This is one reason a countertop drying system can be helpful for frequent pumpers.
You don't have to find another clean surface every few hours and you don't have to remember which parts are already dry.
Can a Bottle Washer Make Pumping Cleanup Faster?
For frequent pumping, this is where automation can make the biggest difference.
A dedicated bottle washer can take several repetitive steps, washing, sanitizing, drying, and storage, and combine them into one workflow.
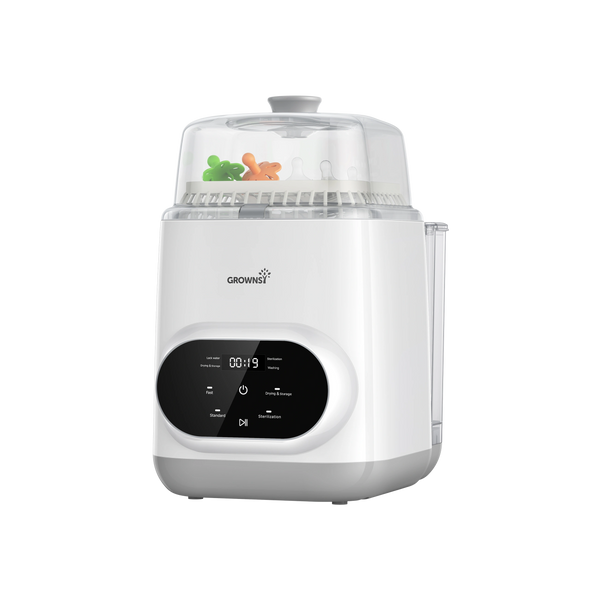
The Grownsy 4-in-1 EaseClean Feeding Bottle Washer Pro is designed for bottles, pump parts, and other feeding accessories. It combines:
Wash → Steam Sterilize → Dry → Store
The machine uses 26 spray jets and 24,000 Pa of water pressure for cleaning. It offers 9 cleaning modes, including a 19-minute Quick Wash, and uses 212°F steam followed by hot-air drying. Its HEPA-filtered storage system keeps cleaned items enclosed for up to 72 hours.
For pumping parents, the value is less about making one wash cycle dramatically shorter and more about removing the repeated manual steps from the day.
How to Build a Simple Pumping Cleaning Routine
You don't need a complicated system.
Try this:
During Pumping
- Pump: Finish your pumping session and safely store your milk.
Immediately After
- Separate: Take apart all milk-contact pump components.
- Rinse: Remove remaining milk residue under running water.
Cleaning
- Wash: Use hand washing, a dishwasher, or a compatible bottle washer.
After Cleaning
- Dry: Allow parts to dry completely.
Before the Next Session
- Store: Keep clean, dry parts in a clean and protected area.
That's the whole cycle:
Pump → Separate → Rinse → Wash → Dry → Store
Once it becomes automatic, you spend less mental energy deciding what to do next.
What About Pump Parts That Are Hard to Clean?
Valves, membranes, connectors, and other small components can be harder to clean because milk residue can collect in small spaces.
Don't assume every pump component can be scrubbed, steamed, boiled, or placed in a dishwasher.
Always follow the breast pump manufacturer's cleaning instructions.
CDC also specifically recommends checking manufacturer instructions before using brushes, steam, boiling water, or a dishwasher because some components may be damaged by certain cleaning methods.
A bottle washer can simplify the workflow, but it doesn't replace checking whether a specific pump component is compatible with the cleaning method.
Safety Tip: Tubing & Motor Care
Never submerge or rinse pump tubing or the electrical motor unit in water! Tubing does not come into contact with breast milk under normal operation. If you see moisture or condensation inside the tubing, run the pump motor for a few minutes while detached from the parts to blow out air and dry it out. If mold appears inside the tubing, replace it immediately.
How Can Exclusive Pumping Parents Reduce Cleaning Work?
If you're exclusively pumping, the cleaning cycle can become especially repetitive.
A practical setup is to combine three strategies:
1. Use Multiple Pump Kits
This creates a buffer between pumping sessions.
2. Create One Dedicated Cleaning Station
Keep your cleaning supplies together.
3. Automate Repetitive Cleaning
When compatible with your pump parts, a bottle washer can handle the washing, steam sterilizing, drying, and storage stages in one place.
The goal isn't to avoid cleaning.
It's to make cleaning less of a daily decision.
Is a Bottle Washer Worth It for Pumping?
A bottle washer is most useful when cleaning becomes a recurring time burden.
pIf you pump occasionally, hand washing may be all you need.
If you pump several times a day or combine pumping with bottle feeding—the same cleaning cycle happens again and again. In that situation, an automated system can help reduce the manual work involved in keeping feeding gear ready.
The Grownsy 4-in-1 EaseClean Feeding Bottle Washer Pro is designed around that everyday workflow, with washing, steam sterilizing, drying, and storage in one countertop appliance. Its 26 jets, 24,000 Pa cleaning system, 9 modes, and 72-hour HEPA-filtered storage are designed to support repeated bottle and pump-part cleaning.
It's not about adding another task to your routine.
It's about taking some of the repetitive work out of the routine you already have.
CDC Sanitizing vs. Washing Guidelines
Sanitizing (via steam or boiling) goes a step further than daily washing by destroying any remaining germs. According to the CDC, sanitizing pump parts at least once daily is critical if your baby is under 3 months old, born prematurely, or has a weakened immune system. For healthy, older infants, daily washing with hot soapy water is sufficient, though daily sanitizing provides extra peace of mind.
Frequently Asked Questions
How can I clean breast pump parts faster?
Create a consistent workflow: separate the parts immediately, rinse away milk residue, use the cleaning method compatible with your pump, allow the parts to dry completely, and keep clean parts stored in a protected area.
Can I wash breast pump parts in a bottle washer?
Some bottle washers are designed for pump parts, but compatibility varies. Always check the breast pump manufacturer's instructions before using a bottle washer, steam, heated drying, or other cleaning method.
Is a dishwasher faster than hand washing pump parts?
It depends on your routine. A dishwasher can reduce manual washing when the parts are dishwasher-safe, but it still requires loading and unloading. A dedicated bottle washer can be more convenient for families who regularly clean bottles and pump parts together.
How long should breast pump parts air-dry?
There isn't one universal drying time. Let the parts air-dry completely before storing them. Avoid wiping them dry with a dish towel.
Can I use the same bottle washer for bottles and pump parts?
A bottle washer designed for both can be useful for mixed feeding gear. Check the product specifications and, importantly, confirm that your specific pump components are approved by the pump manufacturer for the washer's cleaning, steam, and drying functions.
What is the easiest pumping cleaning routine?
For many frequent pumpers, a simple repeatable system works best:
Separate → Rinse → Wash → Dry → Store.
Using multiple pump kits and an automated cleaning system can further reduce the amount of repetitive work.
The Bottom Line
You don't need a complicated pumping-cleaning system.
You need one that you can repeat every time.
Pump. Separate. Rinse. Wash. Dry. Store.
For occasional pumping, hand washing may be enough. For frequent pumping, multiple pump kits, a dedicated cleaning station, and a compatible bottle washer can make the routine easier to manage.
Because pumping already takes time. Cleaning doesn't have to take over the rest of your day.


